My Most Challenging Project in Years! | Veneered Pantry Cabinet
Channel: The Wood Whisperer
Category: Howto & Style
Tags: cabinet-makingveneeringwoodworkingpantrycontinuous grain
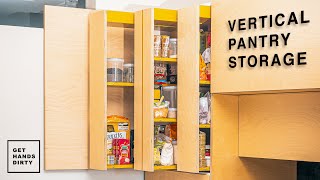
Description: Stuff Use in the Video: + Taper Maker - thewoodwhisperer.com/product/taper-maker-plan-hardware + Veneer saw - amzn.to/3gV3JxF + Countersink Bit - amzn.to/3h2iDRv + Pica Pencil - amzn.to/3vWHefR + VacuPress Systems - vacupress.com + Unibond One Glue - vacupress.com/product-category/veneering-glue/unibond-one + Eagle America #120-0400 Spiral Flush Trim Bit - eagleamerica.com/product/v120-0202/best_sellers + MLCS #7487 - Up-Cut Spiral Bit - mlcswoodworking.com/shopsite_sc/store/html/smarthtml/pages/bt_solid_sets.html My mom has a fairly small condo with limited storage space, so she requested a standing vertical pantry cabinet to help provide more room for kitchen items and food. I honestly wasn’t super excited about the project since it was just a cabinet with some drawers and doors. To make things a little more exciting, I decided to raise the challenge level by including veneering, continuous grain, and a unique door and drawer configuration with rails only and no stiles. All told, this was my most challenging project in years. By far the biggest challenge in this project was keeping the veneer organized. The panel veneer is continuous from top to bottom and each door and drawer is interrupted by a solid walnut rail. So I had to be very strategic about how the panels were glued up and how they were cut apart. Furthermore, because I didn’t want to see any edge-banding, I applied the edging BEFORE the veneer. This way the veneer grain runs all the way from side to side and gives the illusion of solid wood. I mentioned the solid rails already, but those too were cut from single boards to make sure their grain was also continuous. Was it all worth it? I think so. I have never included this much continuous grain on a single project and frankly I’m surprised I didn’t screw anything up. So I got to exercise some woodworking and design muscles, my mom got a nice cabinet to store her stuff in, and you guys get a neat video showing the whole process. I’ll call this one a win-win-win. I hope you enjoy. Join this channel to get access to perks: youtube.com/channel/UCKp44bWWZIiOPShPN_ytShw/join For more information, free plans, and helpful links: SUBSCRIBE! youtube.com/subscription_center?add_user=thewoodwhisperer Take a woodworking class online with The Wood Whisperer thewoodwhispererguild.com SUPPORT US ON PATREON! patreon.com/woodwhisperer PRODUCTS RECOMMENDED BY MARC US - amazon.com/shop/thewoodwhisperer Canada - amazon.ca/shop/thewoodwhisperer UK - amazon.co.uk/shop/thewoodwhisperer CHECK OUT OUR BBQ CHANNEL youtube.com/twwbbq WOOD WHISPERER en Español youtube.com/channel/UCN0YcxiYZrgxp2TVC6W1oWg CHECK OUT OUR SHOP TOURS thewoodwhisperer.com/shop-tours GET INSPIRED BY OUR VIEWER PROJECT LIBRARY thewoodwhisperer.com/viewer-projects DOWNLOAD OUR FREE APP iOS: bit.ly/177u4An Follow me on: TWITTER - twitter.com/woodwhisperer FACEBOOK - facebook.com/thewoodwhisperer INSTAGRAM - instagram.com/woodwhisperer Pinterest: pinterest.com/woodwhisperer